Browse by Solutions
Browse by Solutions
How do I Set Up Custom Views in Invoices?
Updated on March 19, 2018 12:03AM by Admin
A custom view is a feature that allows you to search & filter a list of invoices, then select the columns you want and save a shortcut for later. This view feature is standard, but the views can filter & display any custom fields that you have configured for your business.
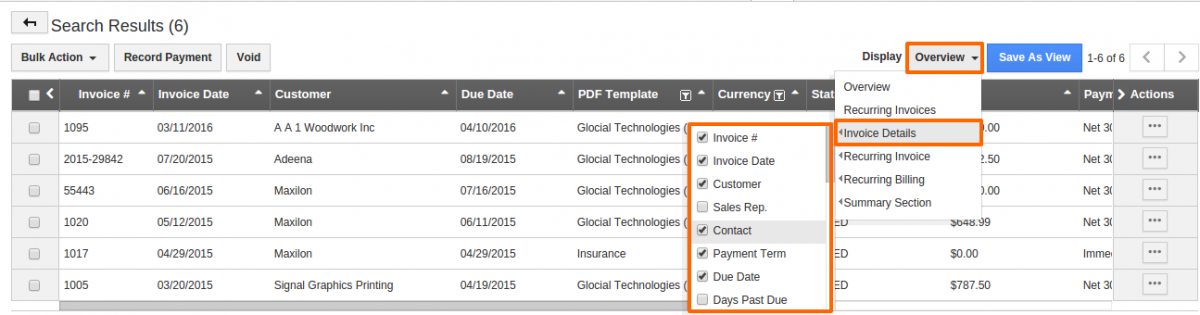
- If you want to view more invoice information, you need to select fields from “Display” field.
- You can save your custom view of invoice information for your future reference in “My Views”.
Steps to Create My Views in Invoices App
- Log in and access Invoices App from your universal navigation menu bar.
- Click on the "Advance search down arrow" in the simple search field at the app header bar.

- Click on "Search" icon at the bottom. For instance: Search for 20% discount invoice's information by entering the discount percent as From 20% To 100% in the specified field.

- You can view the search results as shown in the image below:

- Click on “Overview” drop down in "Display" field.
- Select fields you would like to view in a table format.
- Click on “Save as View” blue button.

- You can view "Save as view" pop up and specify:
- View Name – Name of the view.
- Share With Other Users – Toggle “ON” to share views with others. If needed.

- Click on “Save” button.
To view the custom fields:
- Click on "My Views" from the left navigation panel on Invoices dashboard.
- You can view the created views, as shown in the image below:

- We have created a view in the name of "20% Discount".
Related Links
Flag Question
Please explain why you are flagging this content (spam, duplicate question, inappropriate language, etc):

