Browse by Solutions
Browse by Solutions
How to integrate UPS with Apptivo?
Updated on June 27, 2023 05:49AM by Admin
UPS integration with Apptivo allows you to track and manage your orders with UPS directly within Apptivo, streamlining your business processes. With this integration, you can quickly and easily create shipments in UPS, shipping information, and tracking details. Follow the below steps to integrate Apptivo with UPS. This involves three steps:
- Setting Up UPS Account
- Integrate UPS with Apptivo
- Ship Orders with UPS
Setting Up UPS Account:
- Before you can start integrating Apptivo with UPS, you need to have a UPS account. If you don't have one already, please sign up for a UPS account on the UPS website (https://www.ups.com/).
- Ensure you have your UPS account credentials ready, including your UPS account number, username, and password.
- You can get the UPS account number by logging into your UPS account > Profile > Payment Options and on the Payment Options page, you can find the table with your UPS Account.
Integrate UPS with Apptivo:
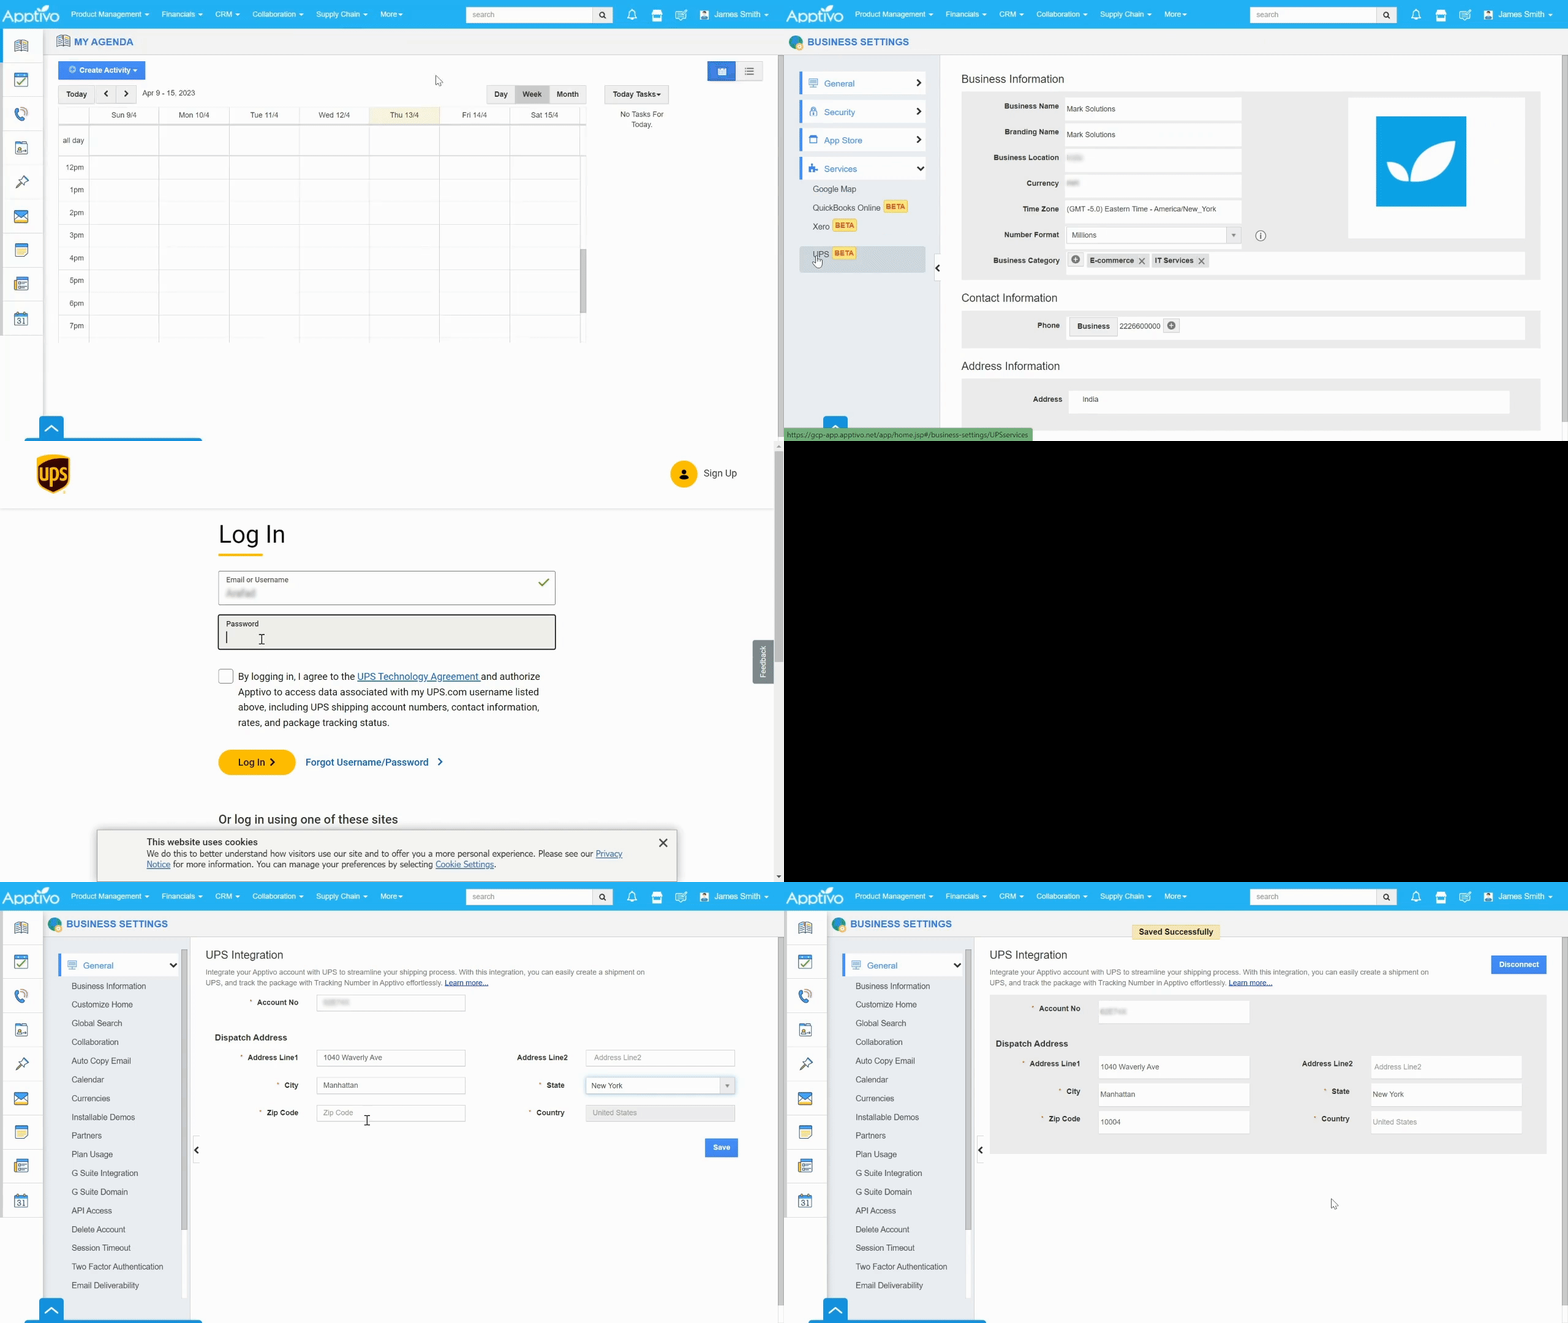
- Log in to your Apptivo account and select Business Settings from the User Menu.
- On the Business Settings page, go to Services → UPS and Click on the UPS button.
- Upon clicking the UPS button, you’ll be redirected to the UPS login page. Here provide the Username and Password and click login to proceed with the integration process.
- After successfully authenticating with Apptivo, you have to provide the required UPS details in Apptivo.
- Now provide the following UPS details in Apptivo:
- Account Number: Provide the UPS account number.
- Dispatch Address: Copy and paste the UPS dispatch address in Apptivo or type it manually. Please note all the fields are mandatory except Address Line 2.
- Once you have provided the necessary UPS details, click the Save button to save your changes. The integration will then be completed.

Ship Orders with UPS:
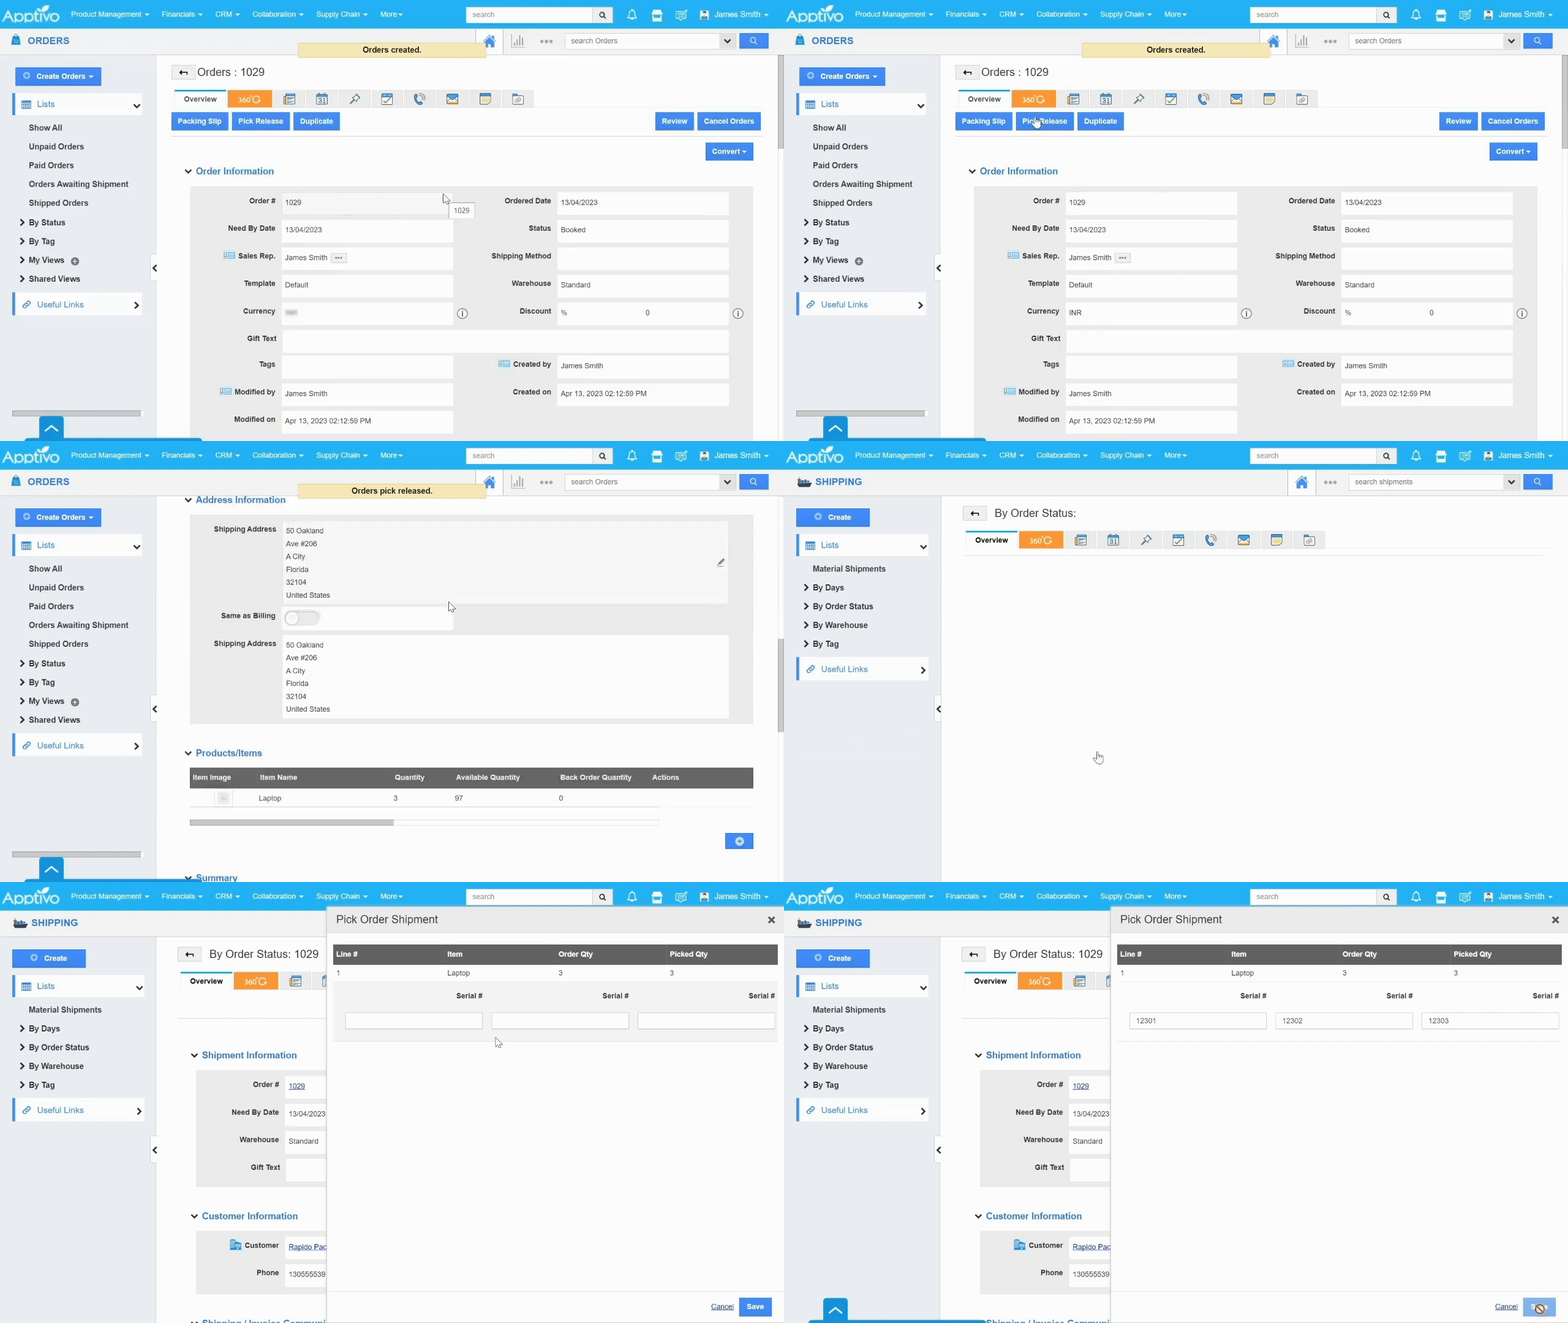
- Create an Order with the contact shipping address.
- Create and Pick release an Order. Once the order has been pick release, the shipment information will be generated.
- Click on the provided shipment link and you’ll be redirected to the shipment overview page on the shipping app.
- Click on the Pick button.

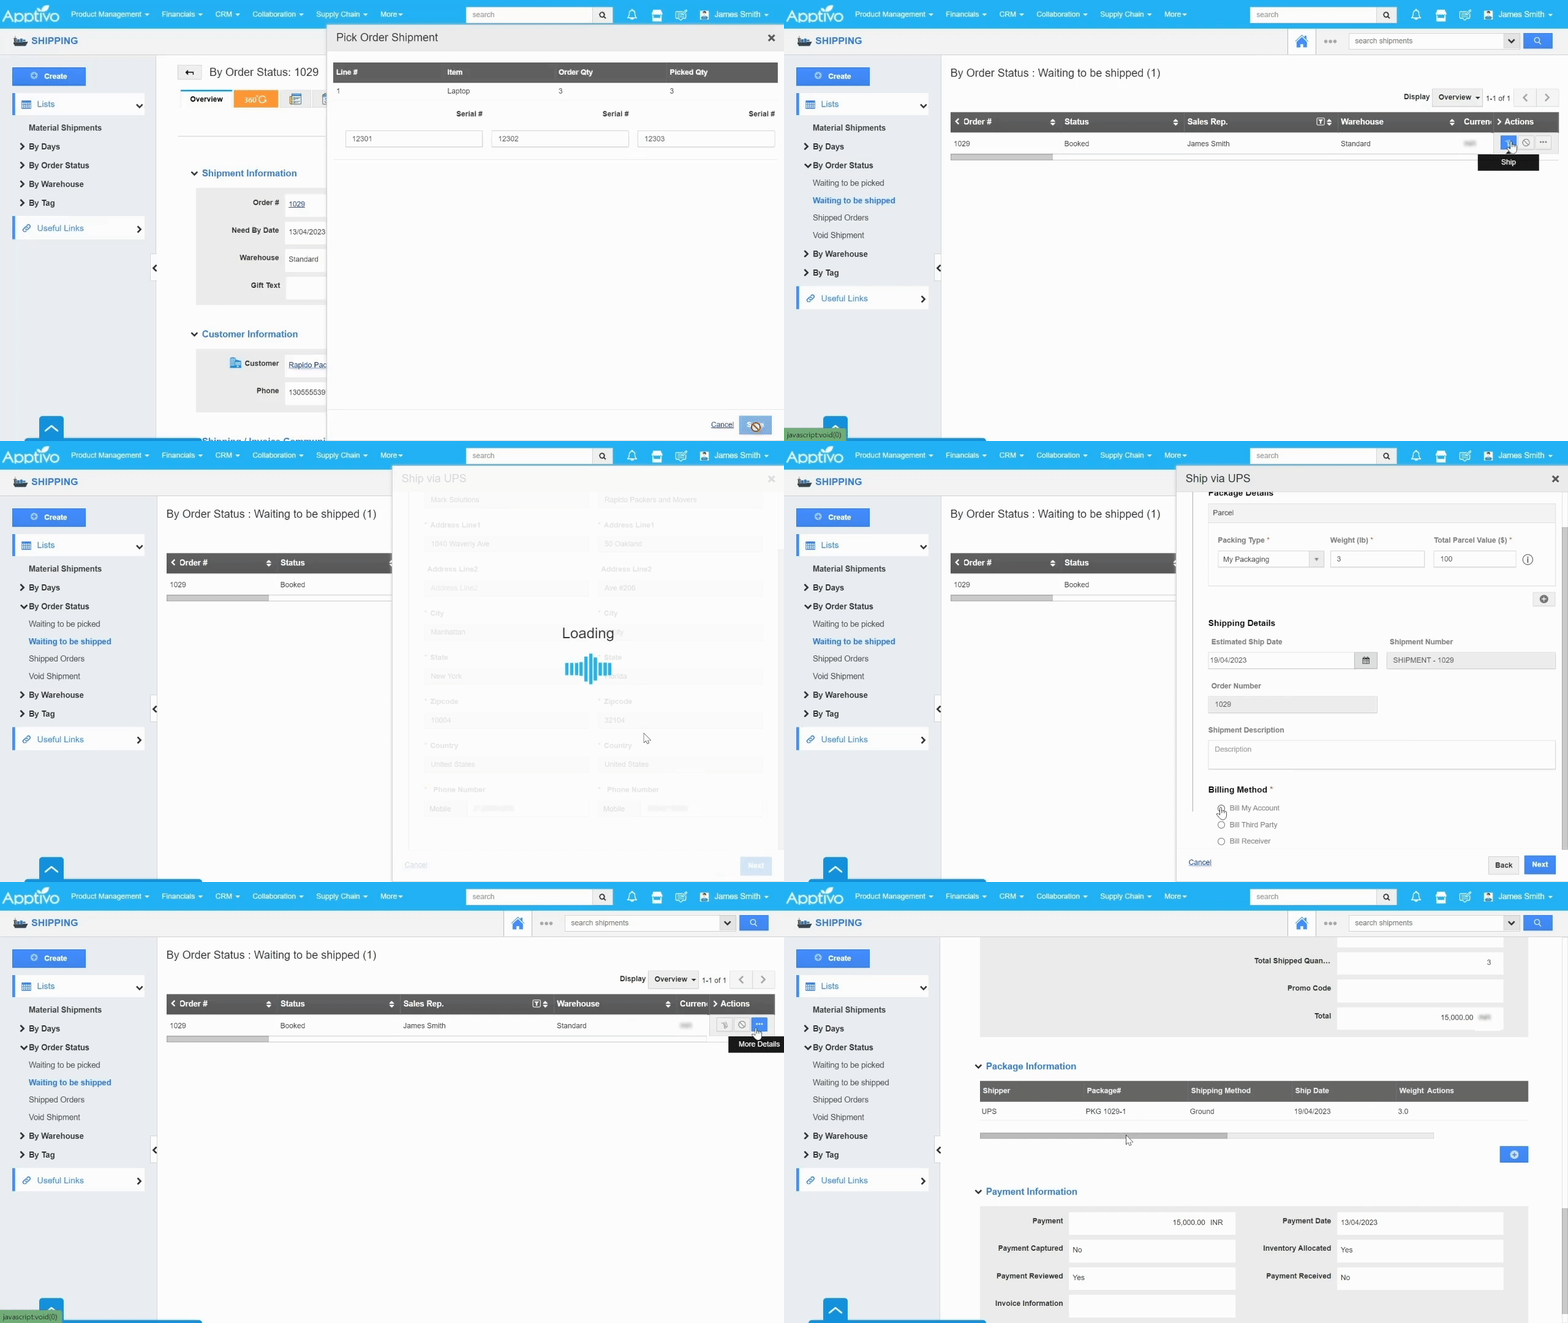
- Here, click on the Ship dropdown and select Ship via UPS to perform the shipping through UPS.
- Ship via UPS side panel will get open, and three steps should be followed:
- Validate the Address:
- Validate the Dispatch Address: This is prepopulated and pulls the address from the business settings.
- Validate the Shipping Address: The Shipping Address will be pulled from the order’s customer address.
- Enter Mobile Number: Manually enter the mobile number and click on the Next button.
- If there are any changes needed, the dispatch address can be updated from the UPS integration page while the shipping address should be updated in the customers app.
- Create Shipment:
- Package Details: Include all packing details related to the shipment package. You can choose the package type from the package type dropdown which is listed in Apptivo from UPS. Additionally, You need to provide the Weight, Length, Width, Height, and Total Parcel Value. The UPS shipping rate will be calculated based on the provided dimension.
- Shipping Details: the Shipment Number and Order Number will be populated automatically from Apptivo and the Estimated Ship Date needs to be provided manually.
- Billing Method: Choose from the following billing methods:
- Bill my Account: This is a prepaid payment that will be billed from your UPS account when the shipment is created.
- Bill Third Party: Bill is charged to a third party who is neither a shipper nor a receiver and is willing to accept the shipping charges with a valid UPS account.
- Bill Receiver: Bill will be charged to the shipment receiver’s UPS account.
- Shipping Method:
- Based on the provided package details, the available shipping methods (air, ground) from the UPS will be displayed with the corresponding cost.. Choose your preferred shipping method and hit Create.
- Now on the shipping overview page, you can view the Package details section, where all the details of the package will be displayed.

Flag Question
Please explain why you are flagging this content (spam, duplicate question, inappropriate language, etc):


