Browse by Solutions
Browse by Solutions
How do I limit Case Creation based on the Customer Type?
Updated on July 10, 2019 02:20AM by Admin
There are numerous situations where you might want to keep your customers informed of the status of their cases. Apptivo provides the ability to add third-party customers to their cases, giving them a separate login so they can view the progress of their existing case details from their own account and even create their own cases using the Apptivo Customer Portal in the Cases App.
Consider the following scenario. Each client will be having an established support level that determines the total number of cases allotted for their creation from their portal login. For a certain period of time from their start date, they will be allowed to create an unlimited number of cases, and after their hyper care stage, the case creation count will be limited.
This feature of Support Plans gives you the ability to define the limit of the case created by the customer, based on the support plan provided. (Note: It is applicable only in the Apptivo Ultimate & Enterprise plans. View Apptivo Pricing)
Steps to create Support Plans
- Go to the Customers App.
- Click on More(...) option ->Settings -> Customers -> Support Plans. Here, you can create multiple plans with the required appropriate limits. By default, “Starts Automatically” Toggle will be turned on. Enabling this Toggle will automatically start the support plan for customers. Then, Click “Create” to create a new support plan.

- In the Create Support Plan page, enter the following details:
- Name - Enter the name of the support plan.
- Description - Enter the description of the support plan.
- Limits - This defines the effective date of the plan, case creation limit type (limited or unlimited), and the limiting number of cases that can be created in this plan (in case of limited). Click Create.
- For instance: Here, the End Day is given as 25 and the Limit as 5, which denotes that the customers with this plan of support can create 5 cases from their portal login for 25 days. (Note: The effective date of this plan will get started when the plan is assigned to the customer)

- The support plan will now be created successfully.

- Go to More(...) icon -> Settings -> Master Layout -> Hierarchical view. Turn on the "Support Plan Information" section toggle and this section will be reflected in the overview page.

Steps to Assign the Support Plan
In this section, let’s now go through the steps of how to assign the created support plans to the customers. For this, we have made a couple of new additions to the Customers App. We have added a new field called the Support Plan and a section called the Support Plan Information, in the Customers Overview page.
Note: Existing users have to enable this section from Settings > Customize App > Master Layout > Hierarchical View > enable the Support Plan toggle under Additional Information section
- Create a new customer or open an existing customer record.
- In the Additional Information section, select the above-created plan from the Support Plan drop down. Click Save.

- The selected Support Plan Information will be displayed in this section. If a new plan is selected then the previous plan will be overridden. The plans selected for the customer will be collected in the Association table.

- The added support plan details can be viewed from the Support Plan Information table found at the bottom of the Overview page. Here, you can have a view of the cases logged by the customer, cases remaining, and cases override. All the previous plan of this customer will be displayed here. You can either "Enable" or "Disable" the plan by clicking the button next to Edit in Actions.

- In case, if you want to create a new support plan right when creating or updating customer, scroll down to the last where you can find the Support Plan Information table. Click Add.
- Clicking on Add will open up the Create Custom Plan popup with the following details:
- Start Date - This will be set to the current date by default. (Note: In case of multiple plans, the End Date of the previous plan will be considered as the Start Date)
- End Date - End Date of the custom plan created.
- Limit Type - Specify the type of plan (limited/unlimited).
- Cases Allowed - Enter the number of cases that can be created, in case of a limited type.

- Finally, click Create.
Support Plan Assignments
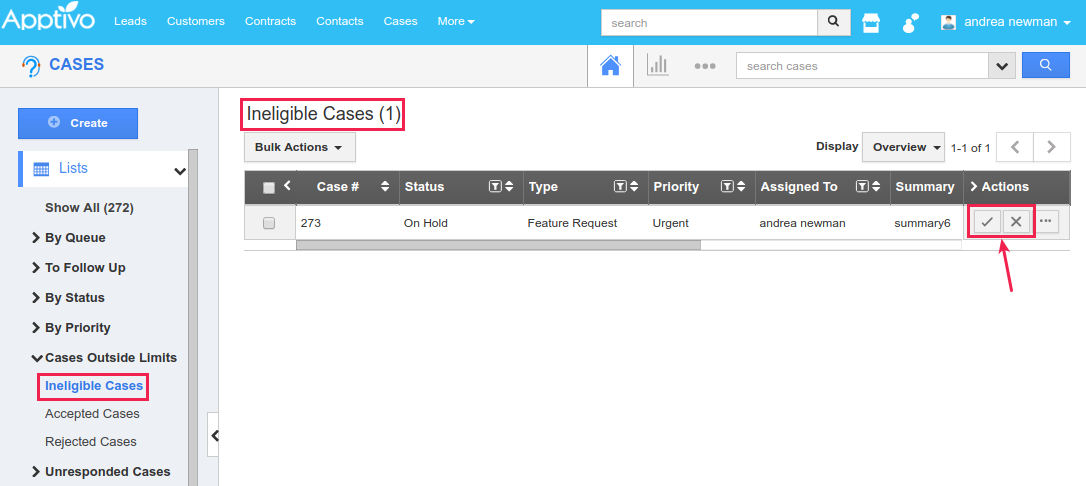
As you all know, the cases created by the customer will automatically get collected in the Cases App. For each case, the customer creates outside his/her limit (that is, cases created on exceeding the cases creation limit), that will get collected in the Ineligible Cases under Cases Outside Limits in the left navigation panel. From the Ineligible cases, the employee can Accept or Reject the cases created by the customer outside of his/her limit.
 |
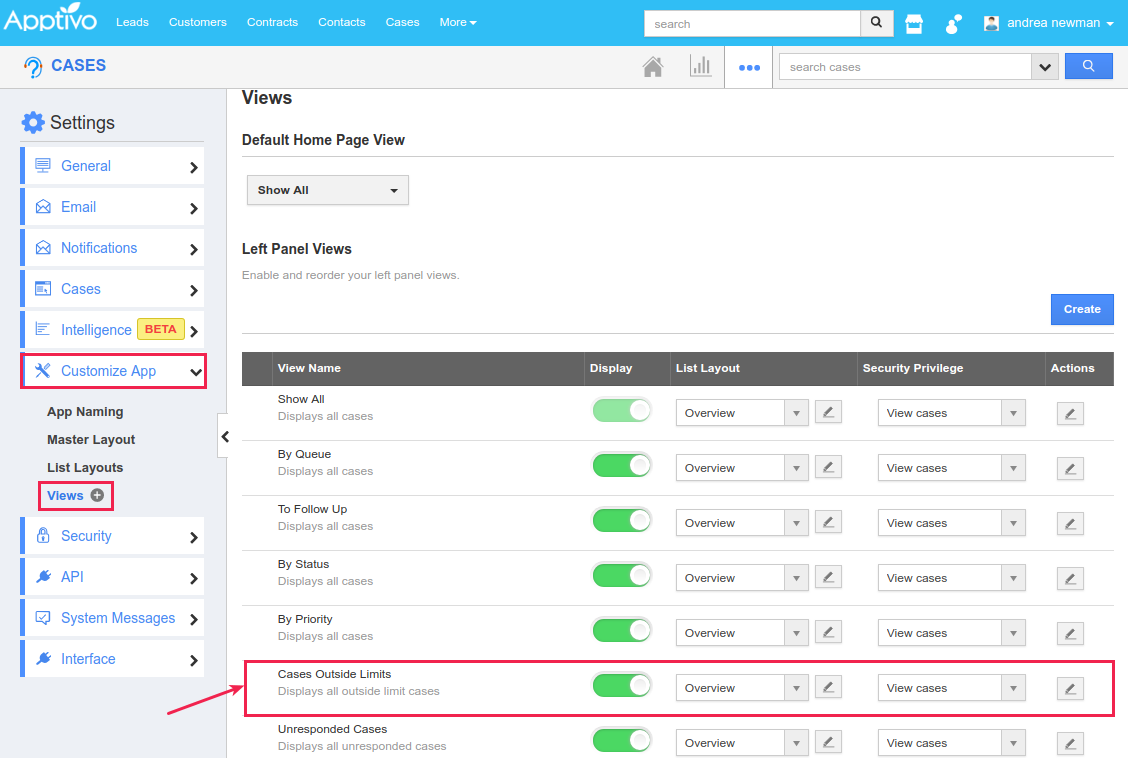
Note: To view the Cases Outside Limits section in the left navigation panel, you need to enable it from Settings > Customize App > Views > Cases Outside Limits.
 |
Now the status of those cases in the Ineligible View can be defined separately in the Cases App.
- Go to Cases App Settings > Cases > Support Plan Assignments.
- This lets you configure the following:
- Support Plan Criteria - Enabling this Toggle lets you set a condition for those cases that need to be limited.
- Case Restriction - This toggle option lets you limit the cases based on the default condition. For eg: If you want the limit cases functionality to be applied for the cases logged through portal, cases logged through app/mobile/API and cases logged through email then enable all the toggle.

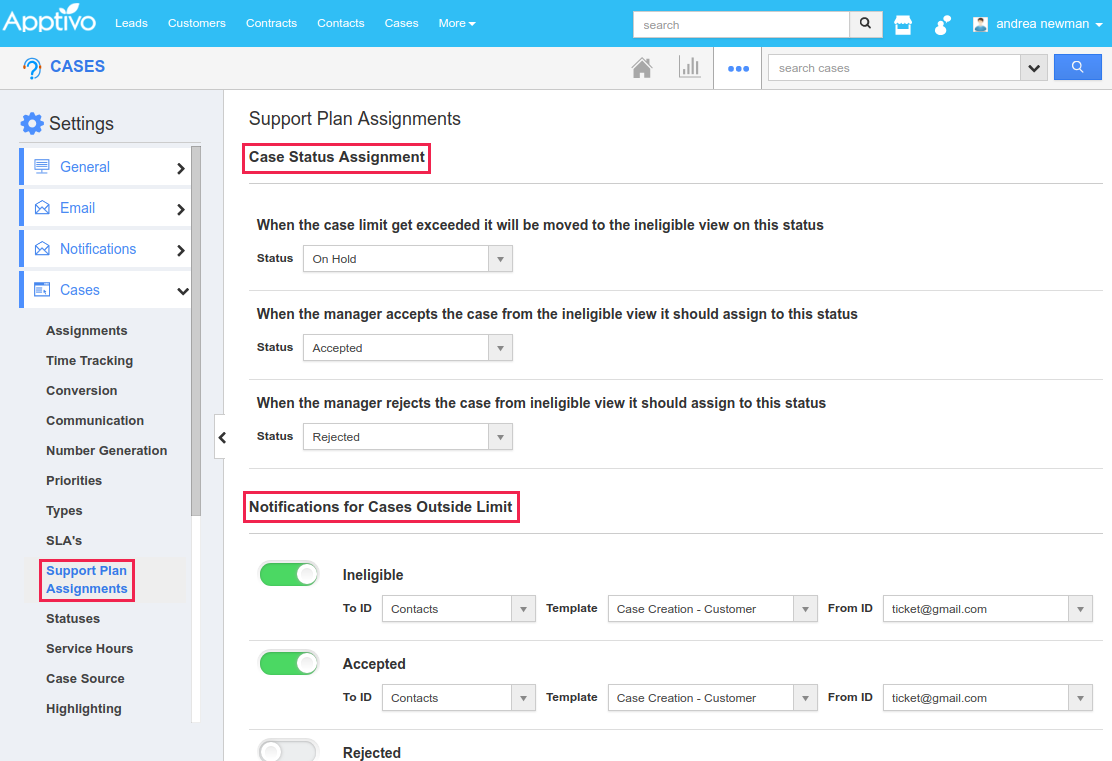
- Case Status Assignment - The Status of the cases created outside the case creation limit and on being accepted/rejected can be defined here, from the Status drop down.
- Notifications for Cases Outside Limit - Automatic email notification with the desired template can be triggered to either the Customer/Contact, for cases outside limit and on being accepted/rejected.
- According to the above configuration, the cases created outside limit will initially be found in the Ineligible Cases with the Status - On Hold.
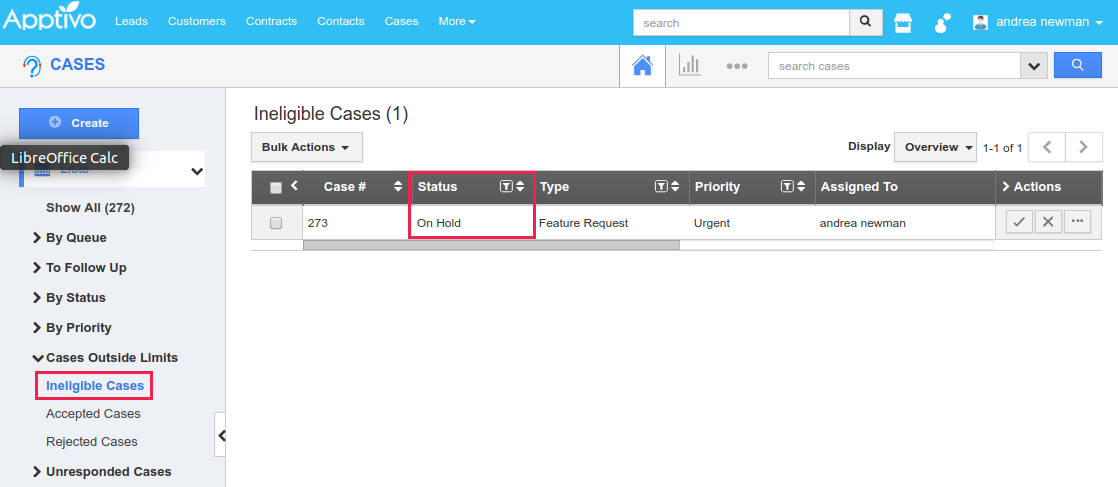
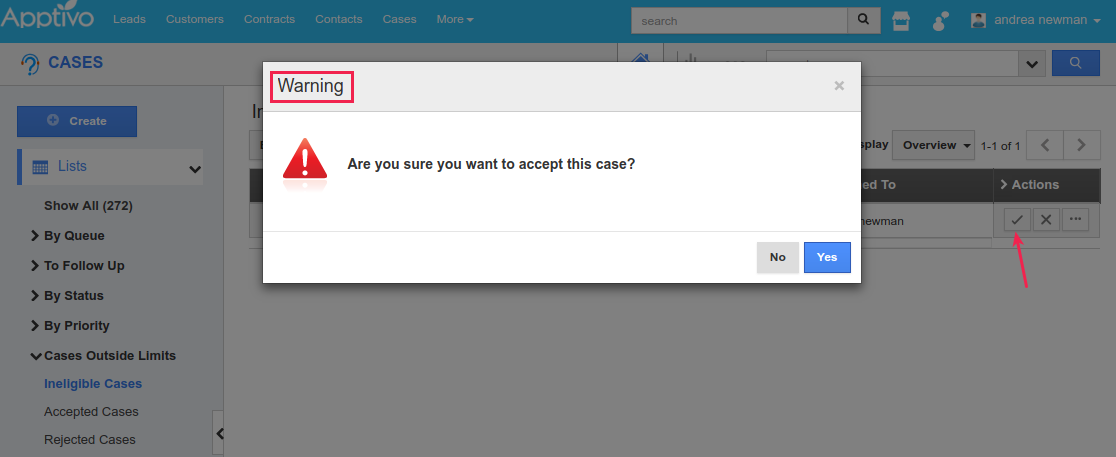
- On clicking Accept, a confirmation popup will be displayed. Click Yes.
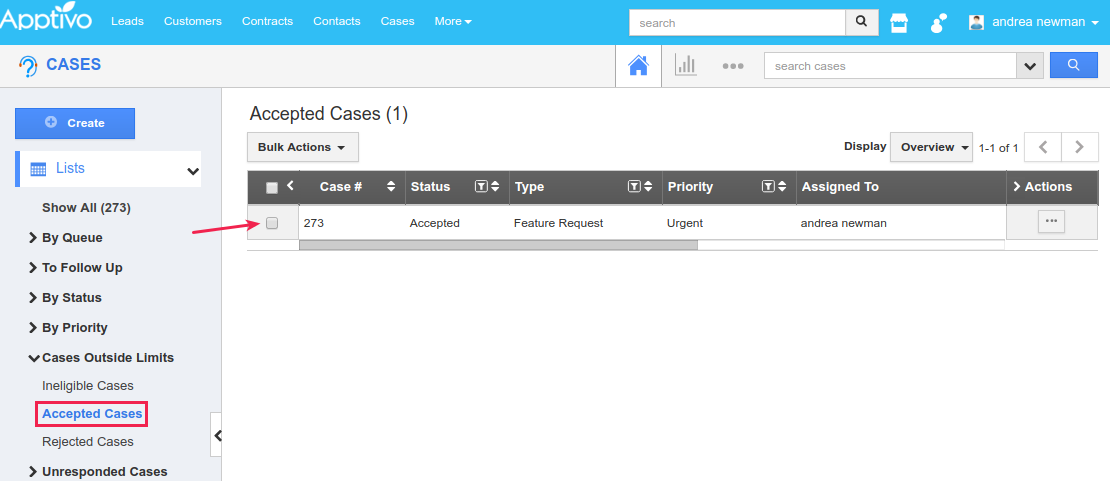
- The case will be accepted and moved to the Accepted Cases under Cases Outside Limits.
- Similarly, on rejecting the case, it will be moved to the Rejected Cases list under Cases Outside Limits.
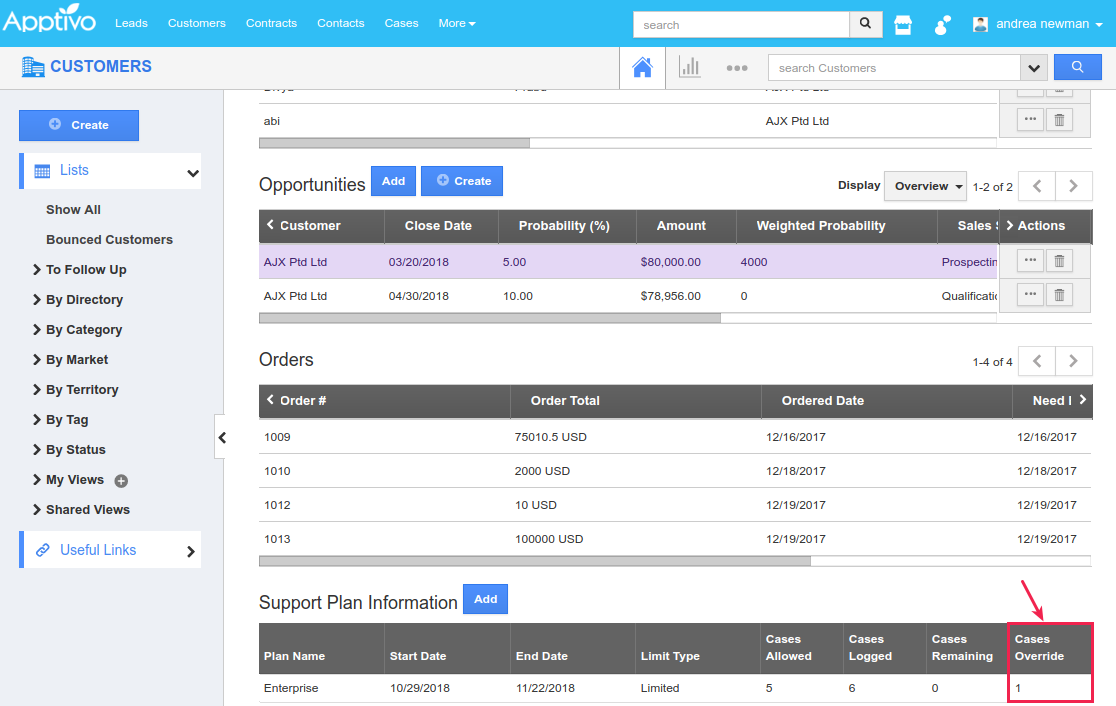
- The count of the cases accepted can be viewed from the customer record under the Cases Override column in the Support Plan Information table.
Thus each customer will have an established support level, based on the customer plan type, that determines the total number of cases allotted within the system.
NOTE: You can limit the cases that are assigned manually and also via email.

