Imagine you're a company looking to expand your reach and generate more business leads. Your success depends on partners who can bring valuable opportunities. Introducing the Partner Portal – a powerful tool in Apptivo CRM that empowers your business allies to seamlessly submit leads.. When these leads get converted into opportunities, your partners get rewarded with commissions, building strong and mutually beneficial relationships.
Steps to setup the Portal for Partners:
To configure the partner portal, the Apptivo account administrator needs to perform several key tasks, including generating the Portal URL, configuring branding settings, and customizing the form layout for the portal's leads and opportunities apps.
Let's proceed with these steps one by one. The first step in setting up the Partner Portal is to customize the application name.
Customizing Application Name
- To Customize the application name of the Distributor App, Navigate to "Distributor App > Settings > Customize App > App Naming."
- Here, change the App name to “Partner Portal” and the updated App name will be reflected on the App Header, Advanced Search, Settings, etc.
Partner Portal Configuration
- In the Distributors App > Settings > Partner Portal, administrators can activate the "Partner Portal" feature. This enables the creation of a unique portal URL, providing secure and customized access for partners.
- To generate the Unique portal URL, the user has to provide their company name on the sub-domain field and click on generate. Based on the given domain name, the system will automatically generate the portal URL.
- Here in this instance, we have provided the subdomain as “bigcommerce” and click the "Generate URL" button. The URL is generated with the given domain name as shown below Screenshot.
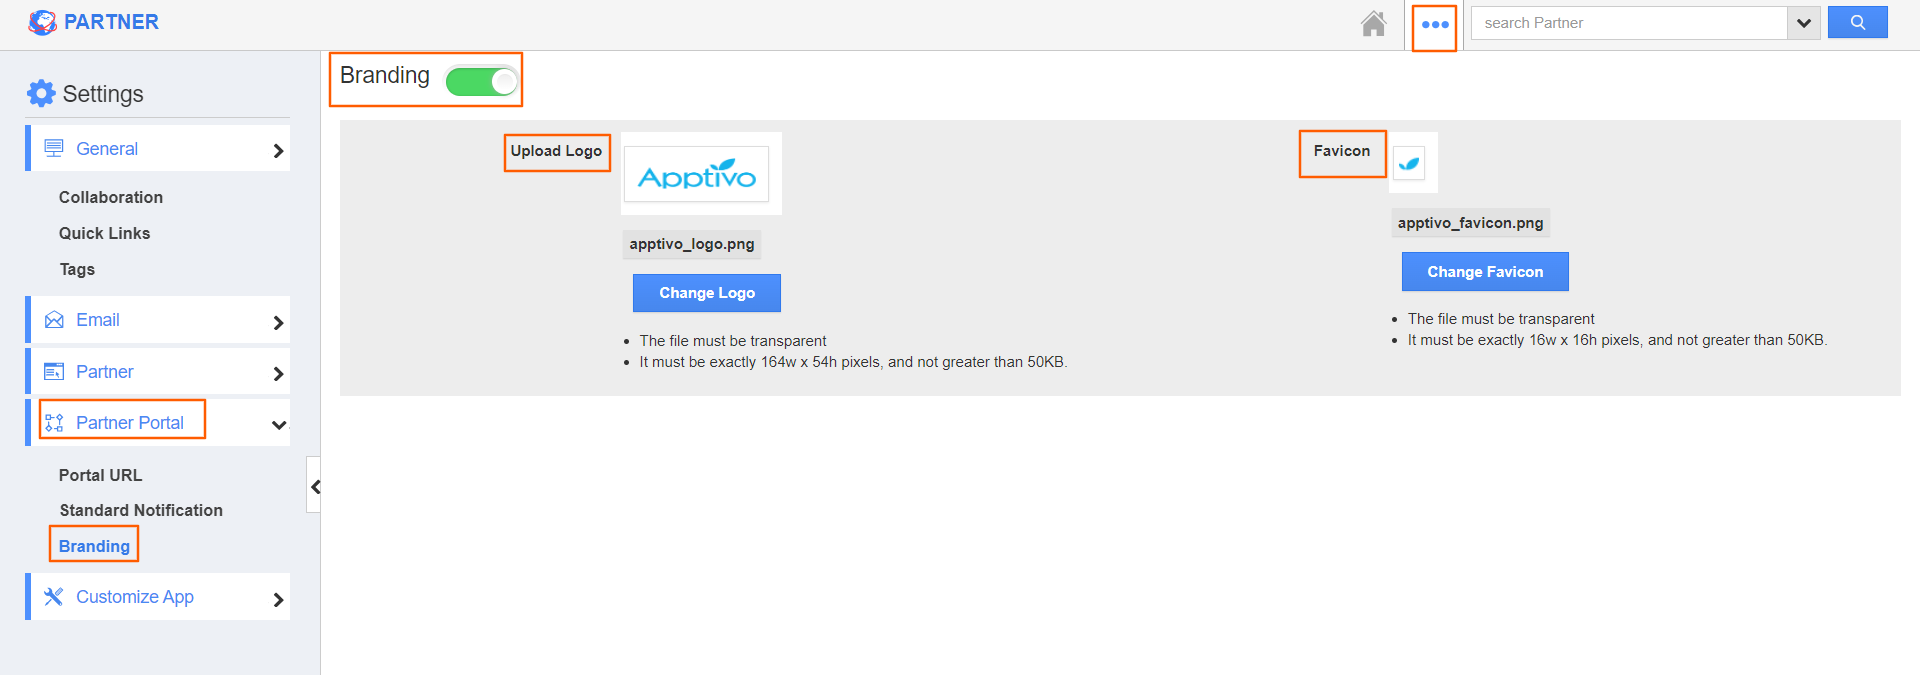
- Additionally, you can brand your Organization on the Portal by adding your company's Logo. To configure, go to "Branding" option under the partner portal drill down, Enable the toggle, and follow the uploading rules to upload your company's logo and favicon. This branding will appear across all the portal screens like Signup, Login, Homepage & Email Templates.
Customize the Portal Layout of the Leads and Opportunities app
There might be a case where your partner has to submit the complete information of the lead on the portal. To manage the fields of the create form, apptivo allows you to customize the layout from the Apptivo. Only when the portal URL is toggled on, in the distributor app settings, you can view the portal layout feature in the leads app settings.
- Navigate to Leads App > Settings > Customize app > Portal Layout, under the customize layout you can find the Partner Layout option.
- By default, the standard fields of the leads application will be available on the portal layout. Furthermore, you can customize the fields by adding them from the Palette. The available fields on the Palette are the fields from the Master layout.
- Additionally, you can rearrange the fields with the portal layout for your business use case. Let's say, the partner should be able to provide the complete details of the lead through the portal. So, here we have added the following fields: First Name, Last Name, Email ID, Best way to contact, and Phone number.
- The fields can be made mandatory as per your requirements in the “Inspector” section. Also, the standard properties in the inspector section cannot be altered.
- These added fields will be available to the partner when they submit a lead. The submitted leads will be collected on the Apptivo’s leads app for the Admin’s review.
- Similarly, The Layout configuration for the opportunities app, includes navigating to the opportunities app settings > Customize app > Portal layout
- By default, the standard fields of the prospect application will be available on the portal layout. Furthermore, you can customize the fields by adding them from the Palette. The available fields on the Palette are the fields from the Master layout.
- You can customize the portal layout for your business needs, allowing partners to provide complete lead details. Add fields such as Opportunity type, created by, closure, follow-up date, and tags. Make these fields mandatory in the “Inspector” section, while the standard properties are unalterable.
Manage Partners
Great! Everything is now set up and ready to go. You can now efficiently manage partners through the distributor's application and grant them access to the portal. Let's walk through the step-by-step process of providing access to partners based on their roles.
- Navigate to the Distributors (renamed as Partner) App, click on the "Create" button, and input your partner information to establish them as a partner in Apptivo. Ensure that you include the partner's email address, as it is mandatory for granting access to the portal.
- After successfully creating the partner, proceed to assign roles. On the record overview page, locate the "App Access Privilege" table at the bottom. Click on "Add" to open the Roles window, where you will find two standard roles:
- Referral Partners: This role grants access to submit and manage leads.
- Commission Partners: This role provides access to view converted opportunities.
- For this specific instance, the partner needs to have the ability to create and manage leads, as well as view opportunities related to their submitted leads. Therefore, both roles should be added for this partner.
- To provide access to your partner, Click on “Enable Login” from the overview page will auto-send a welcome email to the partner to activate the portal account.
How will Partners access the Portal for Lead Submission?
- Once you have enabled the portal access for the partner. The partner receives a welcome email.
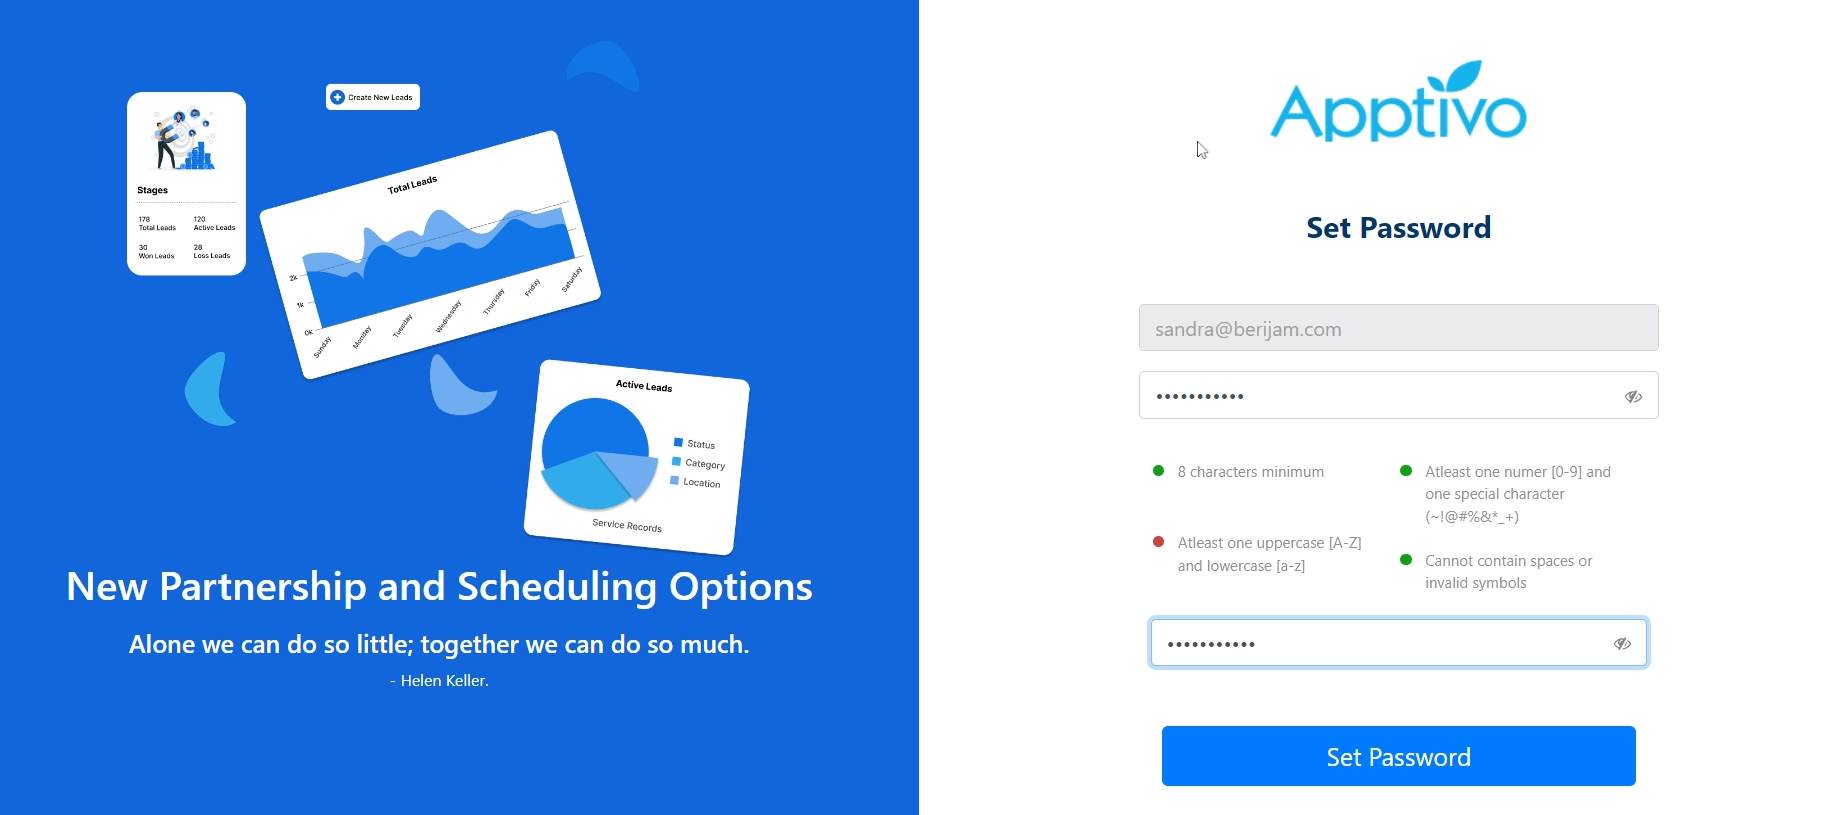
- The partner can set the password by clicking the “Activate” button in the welcome email.
- After having the password set, it will be redirected to the “Set Password” page and confirm the password to the account.
- Once the account is verified and set up, the partner can then log in to their portal and submit leads.
- To refer leads, the partner has to click on the “+” icon to add the lead information. It is mandatory to provide the lead name and email address for the company to effectively communicate with the leads.
- After submitting the lead information, you can review the overview of the created lead and refine the details by editing them. Once you have made the necessary changes, you can click the "Update" button to save the information.
Manage the Referred Leads as Admin
Apptivo grants you the capability to oversee referrals from your partners within your Apptivo account. You may have specific criteria to authenticate leads submitted by your partners and subsequently allocate them to your sales team for further development.
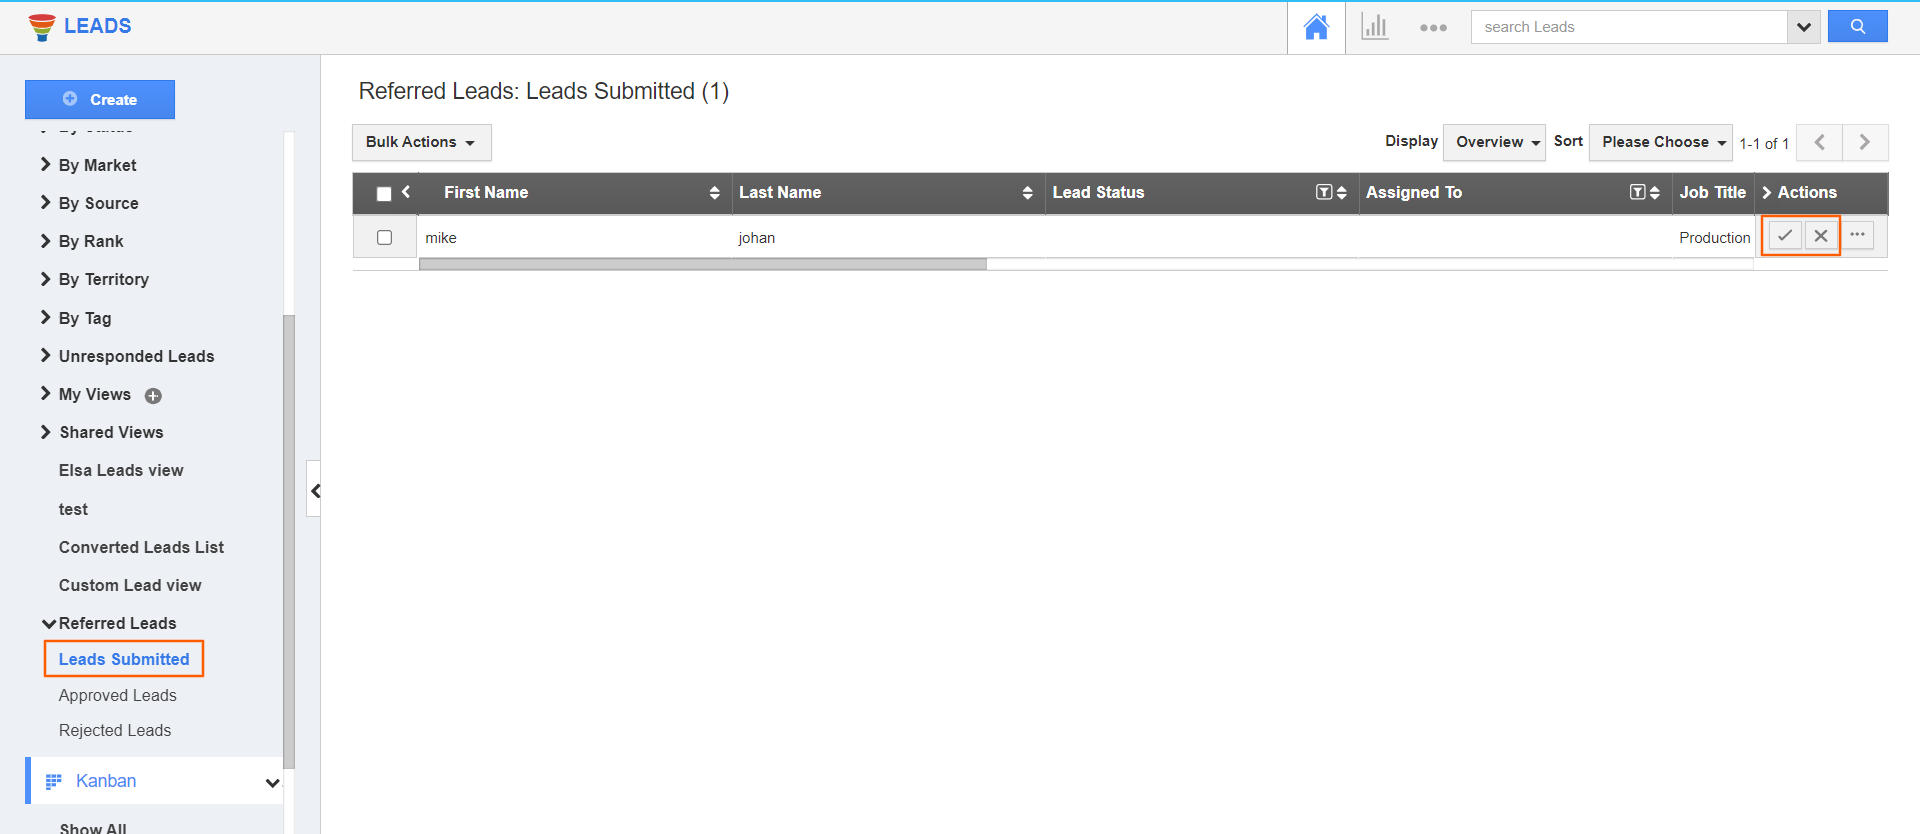
- Navigate to the Leads overview page, Click on the “Referred leads” Section on the Left Panel. You can view the “Leads Submitted” view, where the leads created by the partner automatically populate here.
- In this particular view, the administrator has included the option to either approve or reject the submitted leads. The "Tick" button denotes approval for the submitted lead, whereas the "X" mark button signifies rejection of the submitted lead.
- To prevent the duplication of leads and streamline your workflow, implementing duplication rules is crucial. When leads with identical details are detected, a popup will prompt you to either ignore and accept or reject the lead, ensuring that you can manage and prioritize each lead appropriately.
- A specific duplication rule has been established to detect and flag identical email addresses for leads. Upon detecting duplication, a lead duplication rule popup will prompt you to take the necessary actions.
- After accepting the leads, the business focuses on nurturing and qualifying them to convert into opportunities. Once the leads are deemed ready to convert, their status is changed to "closed won."
- The leads that are rejected with the cross mark will automatically flow into the “Rejected leads” view.
- You can share notes about leads from apptivo with distributors through the partner portal. To do so, navigate to Leads -> Settings -> Collaboration -> Notes. In the “Default Note sharing” section Select the privilege and enable the toggle for effective communication in the partner portal.
- To create a note for a respective lead in, go to the lead's overview, click the notes icon, you will see notes creation pop-up. After entering details, enable the "Share with the distributor" toggle, then click create.
- The notes is shared with the distributor and will automatically reflect in partner portal.
- Navigate to the partner portal, you will see the created note from apptivo in the portal.
- Similarly, the note created from the partner portal will reflect in the Apptivo account for seamless sharing of information. To do so , click “create note” for a particular lead and input the note details and click “create”.
- The create note by the distributor from the portal will reflect in the apptivo account in the respective leads overview page.
- On the Leads page, accessing the individual lead overview allows you to delve into comprehensive partner details. This includes valuable information about the lead's source, specifically identifying the partner who referred the lead. Additionally, the lead's status is prominently displayed.
- The "Referred Lead" status is automatically displayed in the partner portal, providing distributors with real-time information about the referral's status.
- Within the Advanced Search feature, the "Partner Details" section empowers you to pinpoint leads with precision. By inputting a specific name, such as "John," into the search field, the system efficiently retrieves and displays a comprehensive list of all leads referred by John.
- Upon approval of the leads, the Sales Development Representative (SDR) will engage closely with them to facilitate their conversion into opportunities. After the leads have been nurtured to the desired stage, the next step is to convert the referred lead into a fully-fledged opportunity by clicking the "convert" button.
- After a lead is converted into an opportunity, the opportunity details will be reflected in the partner portal application. This enables the partner to access and track the status of the opportunity.
- Once an opportunity is won and converted into a customer, the updated status, such as "closed won," will be displayed in the partner portal. This allows the partner to be informed that the referred lead has been successfully converted.
 |

Note:
- This feature is available for enterprise-level users.
- Before granting portal users access, it is essential to configure the portal layout of lead and opportunities application in Apptivo.
- Apptivo Logo will be displayed on the Partner Portal If you havnt provided your company logos or a favicon using the “Branding” feature.
- You can restrict your partner from accessing the Portal by clicking "Disable Login" from the Partner’s record overview page.
- When an existing partner leaves, their email address will be restricted, and their access to the portal will be denied.
- Email ID fields on the portal will be mandatory by default.
- Make sure the Partner Detail Section is Enabled on the Leads App Master Layout to view the Information of the Referred Distributor and its status.
- Partners now have the capability to append notes to submitted leads, visible to authorized employees within the organization. Similarly, Apptivo allows for the addition of notes directly on leads, which can be effortlessly shared with partners by enabling the "Share with Partner" toggle.


