Browse by Solutions
Browse by Solutions
How do I Configure Relationship Types in Apptivo?
Updated on December 31, 2018 04:27AM by Admin
Build object relationships by keeping track of organization hierarchies, partnerships, and all your contacts' connections. Relationship Type in Apptivo enables you to see the relationship between one object with another object, from each object’s overview page. You can link most Apptivo records together and define the connection or association as to how a record is related to the other.
With this feature you can easily identify the relationships between the following apps - Customers, Contacts, Leads, Opportunities, and Suppliers.
Consider you are running a life insurance agency where the policy holders get created as customers in your Apptivo Customers App. There may be policy holders from the same family and Apptivo gives you the option to specify the relationship between the customers (members of the family) at a glance.
Lets now walk through the steps to configure the customer-customer relationship type. See more example use cases below.
Steps to Configure Relationship Types
- Log in and access the Customers App.
- Go to Settings > Customize App > Relationships > and click Create.

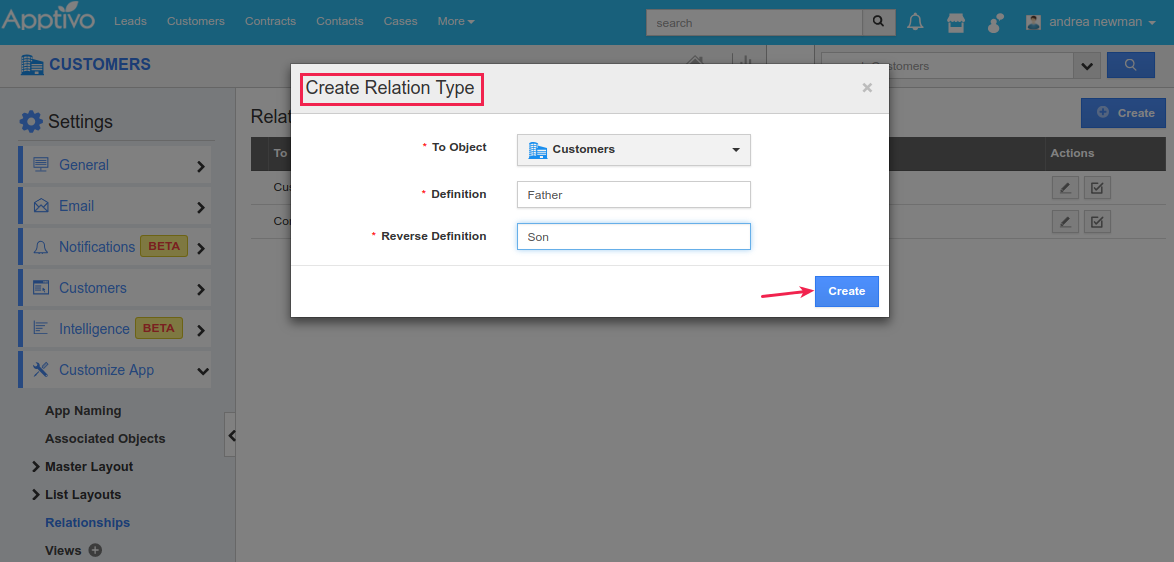
- In the resulting Create Relation Type popup, enter the following details:
- To Object - To Object denotes the app to which the relationship needs to be specified. Here, since it’s a customer-customer relationship, we choose “Customers”.
- Definition - Definition would be the current object relationship type for the To Object. We allow to define your own relationship definition. Here, we have entered the Definition as Father.
- Reverse Definition - Reverse Definition would be the To Object relationship type for the Current Object. Here, we have entered the Reverse Definition as Son.
- Once done, click Create.

- You can view the created relationship as shown in the image below:

- Now, create a new customer or click open an existing customer record.
- On scrolling down, you will find the Relationships table. (Note: Ensure to enable this setting from the Customers App Settings > Customize App > Associated Objects > Relationships toggle. Only then you will find the table)
- Click Add.

- Add Relationships popup will be displayed. Select Customers in the To Object (this lists the relationship types created) and search for the associated customer in the Search Customers field and select the above created relationship in the Relationship drop down. Click Add.

- The customer will be associated with the defined relationship. Here, customer Philip is the Father of the customer RONY.

- And in the overview page of the associated customer (RONY), you can find Philip being added to the Relationships table with the relationship as Son.

More Use Cases
Use Case 1
To define a Customer-Contact relationship, create a relationship type (say, Borrower-Re payer) in the Customers App with the following details:
- To Object - Contacts
- Definition - Borrower
- Reverse Definition - Re payer
On creating, this relationship will get added to the Contacts App Settings > Customize App > Relationships as shown in the image below:


